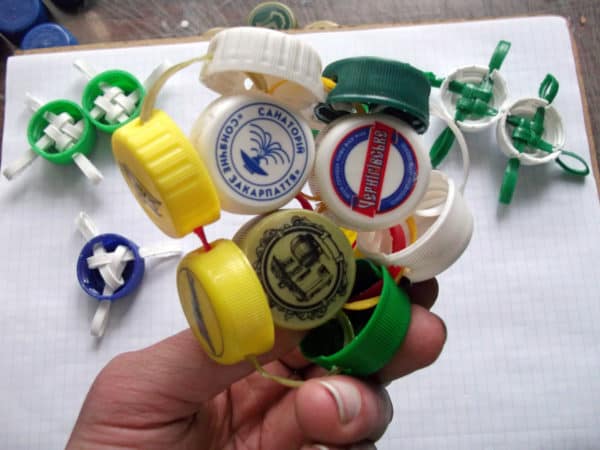
I started collecting plastic bottle caps (the HDPE one’s) last year. I planned to remelt them into handles for tools, but I also had some other ideas of how to utilize them. One of them was to put somehow the separate caps together to form a sheet out of them, and I had a somewhat different idea on how to make that, but suddenly I found out a lot easier way. For these, you’ll need the plastic caps themselves and the plastic rings that go with them on every bottle. The first method of connecting caps together, let’s call it a “triangular ring method,” is the easiest one. It gives you three connections at every cap. You can’t make more than three connections with this method because the limitations that the length of the ring applies (unless you use zip-ties or like to make things unnecessarily complicated). For this, every cap needs some preparation. First of all, you’ll need to put holes on the sides of the cap. Those caps usually have some marks, or segmented screw wich can help to space holes evenly. Make sure that the size of a hole allows you to put two plastic rings snuggly in it. Then make cuts from the outer rim of a cap down to each hole for inserting the ring. You can understand how to put caps together from the photo below. It actually works as a sort of a conductor. You can also make dimensional objects with this technic (see my attempts at the pictures). As I mentioned earlier, you can use zip-ties instead of rings from a bottle. In this case, you don’t need to make cuts at the rim of the cap to put it in; This makes the whole piece more reliable. But even with the bottle rings, it holds together very firmly.
If you want to go fancy, you can use the method I called “the knot in the cap” (you can see examples of photos). It allows you to get 3, 4 or even five connections at every cap and I imagine that by combining that number you can create smooth dimensional surfaces and use the whole idea in a more artistic way. The knot in the cap method also gives you more reliable structure because of the absence of the rim cuts.
So this is it for now. I’ll keep collecting caps for further experiments, and I’ll show you what I get in the future someday. Also, contact me if you have interesting ideas and suggestion on this.


